P r o j e c t  

Javascript
CPT 106 · Franklin College · Erich Prisner · 2002-2006

Part 1: Calculator

Use HTML, Javascript, and CSS to create a working calculator which may look like this.

Part 2: Slide Show

Take a group of 10 pictures. Display the first, and put in buttons as shown to the rright. When clicking the "previous" and "next" buttons, the previous and next pictures should be displayed (note that the previous of the first would be the last, and the next of the last would be the first). When pressing the "automatic" button, pictures should change every second, or every n seconds if the number n is written in the textfield. "randomly automatic would do the same, but the pictures are changing randomly. Finally, pressing the "stop automatic" button should stop this process.

(optional) Additionally, you may also want to create text (about the pictures) that also changes together with the pictures. This can be done using CSS and JavaScript.
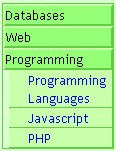
Part 3: Menus

Download the following HTML page and save it. It contains menus, three main menus each one containing submenus. Format this using a stylesheet. The code style="display:none" in the submenus will hide the submenus. Now write a javascript that will display each submenu by clicking on the corresponding word, and hide it again by clicking on it again.

Help for part 1

  1. Create a table and put the buttons into the cells of that table.
  2. The buttons are form elements, so you must insert them into form tags. Name the form (using the name="Formname" attribute) so that you can refer to that from Javascript.
  3. The buttons are created
    • either using the standalone input tag with attribute type="button". To tell what should be displayed on the button you use the value= attribute.
    • >
    • or you use the button tag pair, again with attribute type="button". In this case you write what should be displayed on the button between the opening and closing tag.
  4. The textfield is created using the input tag. The width can be controlled using the size= attribute. It also needs a name (name="Fieldname")and must be inside the form tags mentioned above.
  5. With Javascript you access the contents of that textfield using window.document.Formname.Fieldname.value.
  6. When clicking on the buttons, something should happen. You tell the browser what should happen then by using the eventhandler onclick="Functionname()". Thereby "Functionname()" would be a function, declared in the Javascript part in the head of the HTML document.
  7. The JavaScript sits in the head of the HTML file. You need two variables, one holding the number presently displayed in the textfield of the calculator, one for holding the content of the number previously displayed. Let's call these numbers "actual" and "previous". So start your Javscript by declaring and initializing these varibles, var actual=0; and var previous=0;
  8. Clicking on the number buttons, the number clicked should be appended at the present number ("actual") (except in cases where the decimal point button has been pressed before). You achieve this by activating a function, let's call it "Readnumber(i)" to these buttons. i is an argument delivered when calling the function, meaning that inside the button with number 9 the code would be onclick="Readnumber(9)", and for the other number buttons accordingly. Inside the JavaScript part, in the code describing what "Readnumber(i)" would do, the variable "i" refers to that number delivered. What you do in this function is appending the number i to actual, using actual=10*actual+i;, and writing actual in out textfield, using window.document.Form1.Field1.value = actual;.
  9. Define a function clearing (setting to 0) both numbers "actual" and "previous", and displaying "actual". Call it "Clear()". Refer to it from the "Clear" button using the reference onclick="Clear()"
  10. Define a function "Square()" that squares the content of the variable "actual" and displays "actual" again. Activate this function when pressing the x2 button.
  11. Do the same for the "Log" button. Note that the logarithm of a number x is created by Math.log(x) in Javascript.
  12. To make the "+", "-", "*", "/", "xy" buttons work, we need a new variable remembering (throughout the computation) what kind of operation we are performing. Let's call it "what" and declare and initialize it with var what="plus"; at the beginning of your Javacript. Let "plus", "minus", "times", "divide", "expo" be the values that can be taken by that variable. The default setting would be adding.
  13. When pressing the "+" button, a function "plus()" should be called. This function should set the value of the "what" variable to "plus", should put the contents of variable "actual" into the variable "previous", should set "actual" to zero, and display "actual". After that you would click in another number and finish the calculation by pressing the "=" button.
  14. The "=" button should call a function called "equals()". If "what" has the value "plus" it should add the previous and the actual numbers, store it under the name "actual", and display it.
  15. Now try similar things for the "-", "*", "/", "xy" buttons. You have to define four new functions. You also have to modiufy the code of the "equals()" function, since you would subtract, multiply, ... previous and actual number, depending on the value the "what" variable holds.
  16. Note that for exponentiation xy you would use the predefined function Math.pow(x,y)
  17. Try also to make the decimal point working. You have two states---either the decimal point button has not been pressed for that number yet, or it has. Depending on this state, the number is updated differently. So you have to change the code in the "Readnumber(i)" function.
  18. There might be some further changes you want to make. Let's assume we want to add three numbers 7 and 8 and 9. With our calculator so far, we would press "7+8=+9=", but more convenient would be if we could use "7+8+9=". Try to fix this as well.
  19. In principle, you would have to press the "Clear" button after some computation is totally finished. Can this be done automatically?
  20. Finally you should format the buttons using CSS. If you used button tags, you can just use button as selector, otherwise input as selector would not work, since you would format the textfield in the same way. Then you may want to define a class class="mybuttons" inside the button input tags, and use the selector .mybuttons.

Help for part 2

  1. You need an array of picture names here. Let's assume that the names of your pictures are "Image1.jpg", "Image2.jpg", and "Image3.jpg". You create a JavaScript part in the head of the HTML file and define an array variable with name "Picname" by writing var Picname=new Array("Image1.jpg","Image2.jpg","Image3.jpg");. Then Picname[0] has the value "Image1.jpg", and so on. Note that an array index always start at 0.
  2. The images in your HTML file are also grouped in an array, named window.document.images. You can change attributes of these images, this is the DOM model. You change the source of your first image in your file by assigning a different value to window.document.images[0].src (the source of your first image in your document in your window). Of course, the value that you would assign is some Picname[k], for an appropriate number k.
  3. You need a counter, tracking the number of your picture you are presently displaying. Let's call it k. At the beginning it should be 0, since we are displaying the first image, so put var k=0; into your JavaScript.
  4. Clicking the next" button should increase k by one and display the kth image (having index k-1). You call a function called "next()" when clicking on the "next" button, using onclick="next()", and in the JavaScript part you define this function "next()". Note that special care is needed for the last picture if we want these pictures to change cyclically.
  5. Similiar, a function "previous()" is called when clicking the "previous" button. This function decreases k by 1 and displays the kth image.
  6. For the "automatic" button, you need the predefined function window.setTimeout(a,b) a is the name of a function you define, and b is a time in miliseconds. Executing window.setTimeout(a,b) now means: the browser waits b miliseconds, and after that time it would call function a.
  7. Define a function called "automatic()" in your JavaScript. This function increases k by 1, and after that it calls "automatic()" after 1 second. So you put in the line window.setTimeout("automatic()",1000);. This function is called from the "automatic" button (using of course onclick="automatic()").
  8. If you want to decide how long it takes between changing pictures, you need to read the value given in the textfield, and put it into your "automatic()" function. Remember that both form and field need names for that. Also, you should make sure that "automatic()" still runs, even if the user forgot to put a value into the textfield.
  9. If you want to be able to stop this process, you need one more variable, let's call it "autoon", which has the value 1 if the automatic feature is on, and 0 otherwise. Default value would be 0, which you initiate at the beginning. Update the "automatic()" function so that "autoon" is set to 1 there (However, there is one additional difficulty here: If you write autoon=1 into this function, you will not be able to stop it. Only at the first round it should be set to 1, later rounds should keep it unchanged. Use an additional function "firstautomatic()" which calls "automatic()" after some time, the same as "automatic()" calls itself after some time. Only set "autoon" to 1 in "firstautomatic()"). Define another function, called "Stopauto()" which just sets "autoon" to 0. Clicking the "stop" button would call this "Stopauto()" function.
  10. For the "randomly automatic" feature, you need the predefined JavaScript function Math.random(), which gives a value between 0 and 1. You can use this value just by using Math.random(). Since you want a random value between 0 and 9 (the new array index k), you would multiply this random number by 10 to get a random value between 0 and 10, and take the floor of it (the largest integer smaller than...). The syntax is Math.floor(Math.random()*10). If you have more or fewer than 10 images, of course you would use a different number here. Then define a function called "randomautomatic()", called by the button "randomly automatic".
  11. If you want a text to display to the pictures, you would create 10 div tags, having id "text0" up to "text9". You can access the corresponding HTML element using the command whichtext=document.getElementById("text0"). Then you would display or dedisplay it refering to its display property, either by whichtext.style.display = 'block'; or whichtext.style.display = 'none';

Help for part 3

  1. Remember that eventhandlers onclick=... have to be written inside the anchor tags. They call JavaScript functions you define.
  2. You can change the display property of sub1, sub2, and sub3 by changing the variable sub1.style.display from 'none' into 'block' and from 'block' into 'none'.

Erich Prisner, 2006